Document Management
- Harness your database and document index metadata to precisely locate your documents in seconds.
- Store popular desktop files, including Microsoft Office files.
- Automatic revision control captures each document revision with a full audit trail.
- Optix ensures revision integrity by allowing only one user to revise a document at any given point in time; other users get a read-only version of the file.
- Multiple levels of security provide control over document access and what can be done with them.
How Document Management Systems Work
Document management is the process of capturing and tracking a document the moment your business encounters it, eliminating many of the difficulties associated with managing paper copies. Notably, it’s not just a solution for paper—document management applies to any type of media that can be stored and indexed (made searchable). In addition to handling traditional file formats, a good document management system will also allow you to store electronic artifacts, including audio, video, and creative file formats.
A well-designed document management system reduces the time to find and retrieve documents by capturing information about each document, such as its contents or other metadata. Metadata are additional notes and information about a document that aid in the retrieval, reporting and improve business operations that rely on the document. For example the name of the individual who captured the document, or the name of the driver who delivered the goods associated with a Bill of Lading. Document management systems also capture and index the medium of the document (email, Word, spreadsheet, PDF, or any other application output) to assist in broader search and reporting.
Document management systems accelerate the search and retrieval of information and streamline version control for documents. Most importantly, they centralize file storage and allow you to specify custom permission levels to address the issues of document misplacement, overwriting, deletion, and alteration.
Optix Application Generator
Create indexed repositories, workflows, and folders
Look closely at how vendors deploy document management and workflow systems today and you will find two basic implementation strategies:
- Your system consists of a set of libraries and development tools. Your in-house programming staff designs the indexing screens and links with the vendor libraries to create one-off applications that embed the logic for the screens in the code. To make any changes or add new screens, you must change the code, recompile the custom application, and redeploy. If you do not have an in-house programming staff or cannot afford one, the vendor is happy to supply this service for a fee.
- Your system consists of off-the-shelf applications that are used and proven at all of the vendor client sites. In addition to the standard server and client applications, you are provided tools usable by anyone that allow you to create indexing screen and workflow templates that can be read and understood by the server and client applications. This allows you to design and deploy – on your own and without programming – as many screens and workflows as you need, and does not require extra payments to the vendor.
Obviously, we are big fans of the second approach.
When you select Optix, you get all the tools needed to customize and grow your system. We train and empower you to leverage your new Optix asset – and we’ve crafted our products to make it easy. Our Optix Application Generator lets you create the indexing screens, workflow routes, and shared folders you need, at your own pace, with no programming required. Using an intuitive interface and drag-and-drop fields, even novice users can design sophisticated screens in minutes – you can even customize the appearance by adjusting the fonts, sizes, styles, and color of the text. Dress up your screens with your corporate logo or letterhead. Run your design past your users to be sure it’s exactly what they need. And when your screen is ready (and assuming you have system administrator privileges), deploy it to the Optix Server with a click – and the database tables that power your design are automatically created – no DBA required. If needed, assign custom security to restrict access to specified corporate groups. Once uploaded, authorized Optix Workstation users can immediately begin using the new screen, workflow route, and folders. And if you have Optix Web users, they can use the new assets immediately also.
Create as many repositories and workflow routes as you need to implement your applications. Your system administrator receives full training for the Optix Application Generator at the time your system is installed.
Optix Product Features
Drag-and-drop index screen creation — Drag items from our field menu onto your screen to create new data entry fields, radio buttons, field labels, pop-up menus, pictures, and more. Assign the actual database field names and specify single or combination table keys.
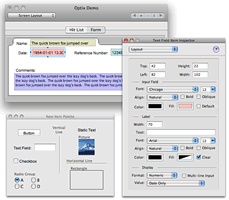
Appearance control — Assign fonts, sizes, styles, and colors to your fields and position them exactly where you want them.
Default values — Fields can be specified to be filled with default values at runtime. Values may include username, date, time, or user-specified text, among others.
Field restrictions — Protect your database by specifying edit criteria for your fields. User-entered data must conform to your specifications at runtime. This allows you to specify a pure numeric field that must contain exactly nine digits for a SSN data entry field for example. Specify case sensitivity as well.
Tab order — Customize the tabbing order between fields to make data entry at runtime more efficient.
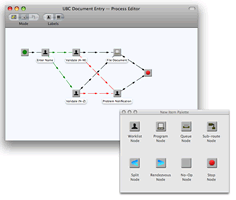
Graphical Route Editor – Create a complex document management workflow in minutes, thanks to a friendly graphical interface that gives you complete control over advanced features like parallel routing, rendezvous, and delegation. And it’s flexible enough to let you create and modify routes for any application.
Steps For a Successful Document Management Project
- Start small and pick one job function to pilot your document management project.
- Appoint a subject matter expert to oversee the document management project.
- Determine which documents and media are critical to daily business operations.
- Consider what data should be searchable and what additional information you might capture along with it to help with retrieval and reporting.
- Identify the document reporting best practices that will drive the success of your project.have a
- Identify which people, roles, or teams will need access to which documents.
- Identify other software systems that will need access to the documents.